Showing posts with label recipe. Show all posts

Wednesday, December 22, 2010

My popular favorite, moist, delicious Scone Recipe.


This is sincerely the greatest scone recipe I have tried. In fact, I had never really had a scone until I made these. Sure, in sheer desperation I have regrettably purchased scones from coffee shops here and there... and lived to tell the tale. But one day I came across this particular recipe on the Joy of Baking website and thought it looked so simple, why not give it a try.

The original recipe is for chocolate chip scones, and they are delicious. However, I have spent months playing around with other flavor combinations and learned some neat tricks along the way and I am finally ready to share my Yummy Scone Recipe!

Some tips before you begin:

·      Have all your ingredients and tools out and ready.
·      Using a baking sheet to pour all your ingredients over so you don’t make a mess on the counter.
·      Your butter must be cold cold cold! Frozen even.
·      When measuring flour, pour the flour into the measuring cup then scrape off the excess with a flat edge. Do not scoop out your flour from the bag using the measuring cup.
·      If you do not have buttermilk, put a tablespoon (or two) of vinegar in a measuring cup and fill the rest of the way with milk or half & half. Allow it to sit for a few minutes. Voila! Buttermilk.

 Flavor choices.
There are numerous choices you can make and experiment with. Here are a few tried and true combinations:
Dried Blueberry / Chopped pecans / lemon or vanilla extract
Dried cherries / slivered almonds / almond extract
Dried cranberries / chocolate or white chocolate chips / vanilla extract
Raisins / 1 tsp of cinnamon / vanilla extract
Dried peaches / 1 tsp cardamom / lemon extract


Ingredients:
2 cups all purpose flour.
¼ cup granulated white sugar
1 ¼ teaspoon baking powder
¼ teaspoon baking soda
¼ teaspoon salt
½ cup (1 stick) unsalted cold butter
A total of 1 cup nuts and/or dried fruit
1 teaspoon extract
2/3 – ¾ cup buttermilk
1 egg
Turbinado or raw sugar for topping
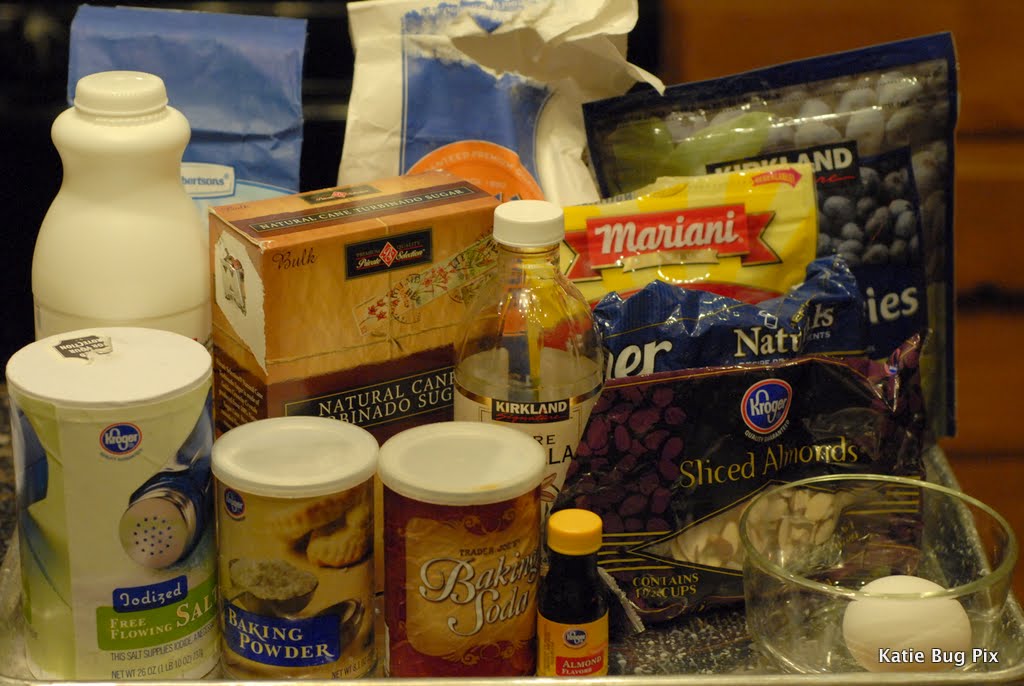
Let's got all our ingredients:

Imagine a big block of butter in here too. Woops.
Let's get all our tools:
Preheat your oven:
Prepare your pan with a spray of cooking spray and parchment paper.
Also, put a handful of flour on your pan for later.
Not sure why the color looks so strange.
Measure 1/2 cup dried fruit into a small bowl and cover it with water. Allow it to sit until you are ready for it. These are dried cherries and blueberries. I'm making cherry/almond and blueberry/pecan.

In large bowl, whisk together the flour, sugar, baking powder, baking soda and salt. 

Remember, when measuring your flour, pour it from the bag into the measuring cup then scrape off the excess with a flat edge.


 Once you have all your dry ingredients, now comes the butter. It better be cold, COLD, I tell you! Frozen, even. I recently learned the greatest trick evah regarding getting the cold butter in small enough mixable pieces for the scones. There is a great food blogger named Brown Eyed Baker and she shared this trick for making perfect pie crust. I knew instantly that it would work for my scones and I can't tell you how happy I was!


Ready? Ready????


A Cheese Grater!!!!!!
Ta Daaaaaaa!!!!!!!!
Here's what I do. First, I buy large blocks of butter because I go through tons of it. You do know you can freeze butter, right? Don't be afraid to buy it in bulk just because you think you won't go through it all. Freeze that buttah!


Since the recipe calls for one stick of butter and one stick of butter equals 1/4 cup, I remove the paper to where the 1/4 cup line is, or somewhat close.


Then, grate!
 And look at this magic pile of slivered cold butter that comes forth!
 I'm telling you, it's almost too much!
 Put the butter in the bowl with the dry ingredients. Using your clean hands, smash the butter between your fingers, mixing it with the flour until it is all incorporated and looks like coarse crumbles.
See? Coarse crumbles.

Now we are going to measure 1/2 cup of slivered almonds. Oh, forgot to mention, this recipe is one of my favorites: Cherry Almond. I messed up above and used vanilla instead of almond extract. Boo hoo! S'ok. They are still amazing.


Now, drain the cherries that have been soaking in water. 

HINT: when using dried fruit in scones, the fruit cannot be larger than a blueberry or it will be too big and make the scone fall apart. So take a large knife and just chop through the fruit a few times. No need to mince it, just a good chop.
Here we have added the almonds and cherries to the dry ingredients.

Now pour in the buttermilk/extract mixture.


I like to take a big wooden spoon and swirl it around the edge a few times before I dig in with my clean hands to mix everything completely. Your hands are often the greatest tool!


Mix until dough just comes together. Then transfer the dough the floured surface on the prepared baking pan.
Shape the dough into a inch and a half thick wheel shape.


(I'm gonna stop right here and say I am so tired of Europeans making fun of how Americans do scones. So we like to add all kinds of nuts and fruit!? So we like them in a cone shape?! What of it! Are we constantly making fun of the fact that you have such little interest in dental hygiene???? Oh wait...)

Anyway, at this point I crack an egg and whisk it around a little. Using a pastry brush brush the entire top of the scone wheel with egg.


Then sprinkle with tons however much Turbinado or raw sugar you like. Or not, maybe you are European and rolling around in disgust at all the sugar this American puts in her pastry. That's OK. I can out-sugar you any day.
Taking a large knife, cut across the wheel a total of 4 times. Like a pizza! So you end up with eight separate scones.
Carefully pull them apart and distance each scone from one another. Scones do not play nice with each other.
 Slide into the oven. Set the timer for 16 minutes then turn the entire pan and add another 2 minutes to the timer.
 Voila! Moist, American Scones! (tee hee) 


You can easily make a double batch of scones, place them on two separate pans, bake one right away and cover the other with plastic wrap. This pan can remain in the fridge for up to three days. Imagine, fresh baked scones during the week!
 

Tuesday, November 23, 2010

Did you know... when transporting mashed taters...

...when needing to tote some of the most amazing mashed potatoes from a recipe by The Pioneer Woman, the finished product fits perfectly into one of these:


In my defense, this is the last of the cookie buckets I have around the house. Promise. Back in the beginning and the testing phases of Oh Katie! Cookies, I was using this particular cookie dough. I tried many and Nestle was the absolute best, I tell ya! Thankfully these big buckets were sold at Costco. So we had many buckets all over the house left over from those days.

In fact, this picture is from the baby's birth, at home. It was so awesome! My husband used those buckets to pour warm water over my back. Thanks dear.


Today our oldest son is having a Thanksgiving Feast at school and I signed up to make the mashed taters. Hence, peeling and cooking potatoes at 7:00AM. No worries. I love creating food that makes others happy. I used the very last cookie bucket we had left in the house and it fit perfectly.

If you don't have your potato dish set for Thursday, I highly recommend PW's recipe. It's amazing!

Thursday, November 18, 2010

Baking Soda and Powder. What's the big difference anyway?!

It's fascinating, this baking thing. The directions are concise, measured, exact, a little crazy sounding even: Mix together..., then in another bowl..., and yet in another bowl..., sprinkle on..., fold in..., pour in three separate measurements..., for high altitude on a sunny day with a rainbow in the east, when the barometer says..., don't over mix, for all that is holy and healthy DO NOT OVER MIX!

The ingredients may seem a little more simple. It's usually a short list of the basics with some flavorful additions: flour, a leavening agent (more on that later), salt, butter or oil, possibly eggs, maybe a liquid, an extract, then possibly chocolate, fruit, nuts, or countless number of fun and tasty (you hope) additions.

What I have found in my recent discovery of Baking Love is this: Baking is a science. Cooking is an art. That does not mean there are not amazingly creative and artistic things that go into baking. We have all witnessed some amazing cakes or hey, what about the cupcake phenomenon sweeping the nation? They key to remember is all baked goods are *basically* made from the same base of ingredients. It is in the formulation of amazing flavors or decorations that the artistry comes in. But a cake or a cupcake, or a scone or a cookie, would not work if the science of the base ingredients were not exact. Or if the preparation aspect of the recipe were not followed to the letter.

Whereas in cooking, there are few (if any) boundaries, endless possibilities, countless combinations; a splash of that, a dash of this, a handful of those, and you can leave that out if you don't like it. Grill it, fry it, broil it, boil it... you'll get something different every time.

Baking is rarely forgiving. One of those unforgiving ingredients is baking soda and baking powder. How often has your recipe called for one and you only have the other and you begin to seriously ponder using the other and wonder "How bad could it be?"

Here are some answers. First, let me say, just get both and make sure you always have them on hand. Especially with the holidays upon us. You'll need them; both of them. Second, I came across a really neat little site called Difference Between. It will surely help you answer many of life's unanswered questions.

According to this site - and many others I have pondered this question to - the difference between baking powder and baking soda:

 
Both baking soda and baking powder are leavening agents, which is a substance, used to produce fermentation in dough or batter. They are added to baking goods before cooking in order to cause them to ‘rise’. Although baking powder contains baking soda, both of these agents are used at different conditions.

Baking soda is pure sodium bicarbonate whereas baking powder contains sodium bicarbonate and other acidifying and drying agents such as cream of tartar and starch. When you use baking soda with moisture and other acidifying agents such as yogurt, chocolate, buttermilk and honey, it produces bubbles of carbon dioxide and cause baked goods to rise. When you add baking soda the reaction begins immediately after mixing the agents, therefore you need to bake the goods immediately or they will not provide effective results.
There are two types of baking powders available. One is single-acting baking powder, which is activated by moisture, so you must bake your goods immediately after mixing and the second is double-acting baking powder which reacts in two phases. Therefore it can last for a while before baking. Majority of the carbon dioxide is released after the temperature of the dough increases in the oven.

Yes, I basically copy and pasted the entire page, but I find it fascinating and hey, I don't have a clue how I could have rewritten it better than that! Besides, I give full credit to the amazing site.

So now you know, even when a recipe calls for 1 1/4 tsp of baking powder and 1/4 tsp of baking soda... just do it. It's important. And now you know!

And don't forget...


Monday, November 15, 2010

Blueberry Ginger Muffins are Really, Really Good!!!

I was following @healthyhomerecipes on Twitter. I am going to refer to it as "it" because It is impersonal and simply spews out recipes all day long. Correction: links to recipes on Its site, which is just as impersonal. I don't really like it. But this recipe for Blueberry Ginger Muffins grabbed my attention. So I bit. And I printed. And I made them this morning. And they are really really good!

I followed the recipe completely, only adding 1/2 cup of broken walnuts. I like crunch. Broken? How do you describe walnuts that have been placed in a plastic bag and smashed several times with a 1 cup metal measuring cup? I think broken fits the bill right now. It's early.

This was one of the first times I have actually put out ALL my ingredients and tools and had everything ready to go. It was an amazing experience and I will do that from now on. Yay learning!

The recipe has molasses. Yum! I knew it was going to be amazing right from the get go.

I have normal sized muffin pans. I like normal size baked goods. I'm just really not in to the bigger-than-your-head cookies and muffins. I get that it appeals to our society as a whole, but not to me. I will bake you muffins that are normal size. And you can eat as many as you like.


After 20 minutes the muffins looked really dark. But after inserting a wooden skewer I could tell they were not.quite.done. But, oh so close. After another minute - was it two? - I took them out and hoped for the best.

They are amazing! They are moist, soft, and the ginger is really subtle.

Wednesday, November 10, 2010

Tartine Brownies or The Most Amazing Brownies You Will Ever Have

I came across this recipe on the Divine Baking Blog and I am forever grateful! The author declares these as the best brownie ever and and her search for the perfect brownie has (probably) ended.

These bad boys contain a POUND of chocolate. Yep. You read that correctly. A pound!

I had no clue what the word "tartine" meant, so a a quick search revealed Tartine is a world-renowned bakery in the Mission District in San Francisco.

This recipe comes from one of their many recipe books.

Here's the recipe followed by my glitches and then redemption.

NOTE: The brownies are ready even when tester comes out wet.

Tartine Brownies Recipe:
3/4 cup butter
1 pound bittersweet chocolate, coarsely chopped
3/4 cup + 2 tablespoons all-purpose flour
5 large eggs
2 cups brown sugar
1/2 teaspoon salt
1 teaspoon vanilla
2 cups nuts, optional for topping

Preheat the oven to 350F. Butter a 9-by-13-inch glass baking dish.
In a small saucepan, melt the butter over low heat. Remove from the heat and add the chocolate. If the heat from the butter does not fully melt the chocolate, put the pan back over the heat for 10 seconds and stir until melted. Set aside to cool.

Sift the flour into a small mixing bowl. Set aside. In a medium mixing bowl, combine the eggs, sugar, salt, and vanilla. Using a mixer fitted with the whisk attachment, beat on high speed until the mixture thickens and becomes pale in color and falls from the beater in a wide ribbon that folds back on itself and slowly dissolves on the surface, 4 to 5 minutes. Using a rubber spatula, fold the cooled chocolate into the egg mixture. Add the flour and fold it in quickly but gently with the rubber spatula so that you don’t deflate the air that’s been incorporated into the eggs.

Pour the batter into the prepared dish and smooth the top with a spatula. If you are using nuts, evenly distribute them across the batter. Bake until the top looks slightly cracked and feels soft to the touch, about 25 minutes. Let cool completely on a wire rack.

Using a sharp knife, cut into 12 squares, or size desired. The brownies will keep in an airtight container in a cool place for up to 1 week.
I did not have bittersweet chocolate on hand - I am one of those that tends to believe chocolate that is less sweet than semi-sweet is blasphemous. So I took out my scale and weighed 16 ounces of semi-sweet Tollhouse morsels .

The recipe also calls for a lot of mixing (on high!) of the egg/butter mixture. This is extremely important to get lots and lots of air into the mixture. Sometimes air is good, sometimes it's bad in a recipe. Follow the directions! Mixing in the chocolate and flour was a bit scary - I didn't want to lose all that air!

My pan was also too small - time to go pan shopping! (My husband will love me.) It was a glass pan but was only 8 x 12 (I think). I used it anyway and fretted the entire time.

I also doused the top with walnuts. I love crunch!

After the 25 minutes was up they looked like they might be done - it was tough to see any cracking through the walnuts, although I sorta did, and they were pulling away from the edges so I removed them anyway. After sitting for a few minutes I decided to try cutting them into squares. I began scoring the top with a knife and realized the center was pure goo. Not good. I almost started to cry and knew I had to walk away to gain my composure - and probably rescue a child off of a nightstand somewhere.

Then I thought, hey I can just put those back in the oven. Might as well. If it goes bad, then it's no more of a loss than right now with completely uncooked brownies. So I reheated the oven and threw them back in there. Set the timer for another 25 minutes, based only on a feeling. When the timer went off I raised it again another five - don't mess with me you Undone Brownies!

Took them out, cooled a bit, then cut them. They were perfect. Shew!

Although a warm brownie seems like a dream come true, I have to say I was pretty much scooping out crumbly hot brownie crumbs and burning the entire inside of my mouth, refusing to spit it out and risk wasting such a perfect specimen of brownie. But when I came home later and they had completely cooled, they stayed together much better and were able to be enjoyed by all - and again at 9:30 this morning, they are perfect!

Friday, November 5, 2010

Found a bundt recipe and then made it.

As I'm getting a grasp on this Twitter avenue, I stumbled across a recipe for a Brown Sugar Bundt Cake that would not quit hounding me. I had to make it!

When my husband took the two kids to school this morning I asked him to stop and get me a couple apples - not Red Delicious and not green. He brought me two perfect Fuji apples. When I squealed and said they were beautiful, "Beautiful?" he asked. Yes! Beautiful!


I followed the recipe to the letter. As I was mixing the dry ingredients I wondered if there shouldn't be a few more spices but I refrained and thought I would give it a go.

I used one chopped up apple. I didn't bother to peel - I think the peel is cool and it adds something. I don't know what and I don't care.

A few basic baking tips:

When baking a bundt oil and flour the pan thoroughly then do it again! Maybe not really, but it has to be done really really well.

Break your eggs into a separate bowl instead of the mixing bowl with all the other ingredients. Digging out those itty bitty shells stinks! But chewing on one is even more awful. Trust me: your world will be a happier place if you break your eggs in a separate dish first before adding them to the entire mix.

A tablespoon of butter is 1/2 an ounce. Therefore a stick of butter is four ounces. You can take it from there.

No buttermilk? Pour a tablespoon into a measuring cup then add enough milk (in my case 1/2 and 1/2 or whipping cream. It's just the way I do things) to the measurement needed. Allow it to sit for a few minutes to do whatever it is it needs to do.

After the allotted amount of time you can tell when a bundt is done because it will start pulling away from the sides of the pans. A stick sunk into the middle of the cake will come out clean.

Allow the cake to cool for a few minutes but not over ten. Ten minutes is that magic number. Get it out of the pan before that and you should be safe.

The recipe wasn't too clear on how to make the glaze, so neither was I. But I went with it. In a small sauce pan I tossed in probably a cup of brown sugar then added whipping cream till - well, I don't know when - till it felt right. Turned on the heat and stirred hear and there till I could tell the brown sugar was melted. I had more than enough glaze so I drowned the heck out of the cake.

The cake was just insane. I literally couldn't stop myself and I knew it. So I cut half of it and handed to one of my son's teachers when I picked up from school. She said I was going to make her fat. "Better you than me," I yelled. I couldn't stop eating it. My husband scowled at me the next morning saying I was lucky there was any left. Ha! Hardly! Man, it was amazing.