

This is sincerely the greatest scone recipe I have tried. In fact, I had never really had a scone until I made these. Sure, in sheer desperation I have regrettably purchased scones from coffee shops here and there... and lived to tell the tale. But one day I came across this particular recipe on the Joy of Baking website and thought it looked so simple, why not give it a try.
The original recipe is for chocolate chip scones, and they are delicious. However, I have spent months playing around with other flavor combinations and learned some neat tricks along the way and I am finally ready to share my Yummy Scone Recipe!
Some tips before you begin:
· Have all your ingredients and tools out and ready.
· Using a baking sheet to pour all your ingredients over so you don’t make a mess on the counter.
· Your butter must be cold cold cold! Frozen even.
· When measuring flour, pour the flour into the measuring cup then scrape off the excess with a flat edge. Do not scoop out your flour from the bag using the measuring cup.
· If you do not have buttermilk, put a tablespoon (or two) of vinegar in a measuring cup and fill the rest of the way with milk or half & half. Allow it to sit for a few minutes. Voila! Buttermilk.
Flavor choices.
There are numerous choices you can make and experiment with. Here are a few tried and true combinations:
Dried Blueberry / Chopped pecans / lemon or vanilla extract
Dried cherries / slivered almonds / almond extract
Dried cranberries / chocolate or white chocolate chips / vanilla extract
Raisins / 1 tsp of cinnamon / vanilla extract
Dried peaches / 1 tsp cardamom / lemon extract
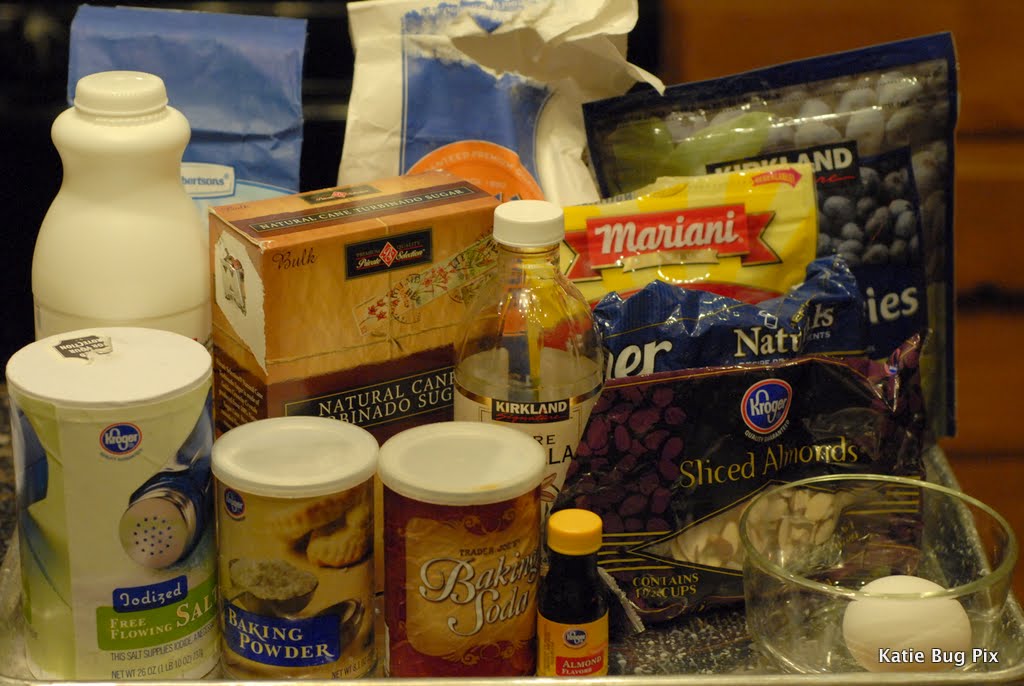
Ingredients:
2 cups all purpose flour.
¼ cup granulated white sugar
1 ¼ teaspoon baking powder
¼ teaspoon baking soda
¼ teaspoon salt
½ cup (1 stick) unsalted cold butter
A total of 1 cup nuts and/or dried fruit
1 teaspoon extract
2/3 – ¾ cup buttermilk
1 egg
Turbinado or raw sugar for topping
 |
| Imagine a big block of butter in here too. Woops. |


 |
| Not sure why the color looks so strange. |


Remember, when measuring your flour, pour it from the bag into the measuring cup then scrape off the excess with a flat edge.

Once you have all your dry ingredients, now comes the butter. It better be cold, COLD, I tell you! Frozen, even. I recently learned the greatest trick evah regarding getting the cold butter in small enough mixable pieces for the scones. There is a great food blogger named Brown Eyed Baker and she shared this trick for making perfect pie crust. I knew instantly that it would work for my scones and I can't tell you how happy I was!

Ready? Ready????
A Cheese Grater!!!!!!

Here's what I do. First, I buy large blocks of butter because I go through tons of it. You do know you can freeze butter, right? Don't be afraid to buy it in bulk just because you think you won't go through it all. Freeze that buttah!
Since the recipe calls for one stick of butter and one stick of butter equals 1/4 cup, I remove the paper to where the 1/4 cup line is, or somewhat close.

Then, grate!


 | |
| See? Coarse crumbles. |
Now we are going to measure 1/2 cup of slivered almonds. Oh, forgot to mention, this recipe is one of my favorites: Cherry Almond. I messed up above and used vanilla instead of almond extract. Boo hoo! S'ok. They are still amazing.

Now, drain the cherries that have been soaking in water.
HINT: when using dried fruit in scones, the fruit cannot be larger than a blueberry or it will be too big and make the scone fall apart. So take a large knife and just chop through the fruit a few times. No need to mince it, just a good chop.


Now pour in the buttermilk/extract mixture.

I like to take a big wooden spoon and swirl it around the edge a few times before I dig in with my clean hands to mix everything completely. Your hands are often the greatest tool!

Mix until dough just comes together. Then transfer the dough the floured surface on the prepared baking pan.


(I'm gonna stop right here and say I am so tired of Europeans making fun of how Americans do scones. So we like to add all kinds of nuts and fruit!? So we like them in a cone shape?! What of it! Are we constantly making fun of the fact that you have such little interest in dental hygiene???? Oh wait...)
Anyway, at this point I crack an egg and whisk it around a little. Using a pastry brush brush the entire top of the scone wheel with egg.

Then sprinkle with


You can easily make a double batch of scones, place them on two separate pans, bake one right away and cover the other with plastic wrap. This pan can remain in the fridge for up to three days. Imagine, fresh baked scones during the week!
Mmm! Think I might try these for Christmas morning.
ReplyDeleteOh! I can't wait to try this out! I've wanted to make scones for a while and this sounds perfect! Love the pics along the way! Thanks Katie!
ReplyDeleteI love the idea of freezing and grating butter. What a little gem! You are a baking genius.
ReplyDeleteYou're adorable and I love you so much! I read this whole recipe in "your" voice. Not only do you talk with your hands, you "talk" with your repeated words, pauses, asides, exclamation points and question marks. Scones are one of my absolute favorites! I've been stepping off the gluten-free train periodically and thus far, no great tragedies have occurred. I look forward to a day that is now happily looming on the horizon, when you have the tea kettle on and I'm on my way over with a basket of fresh-bakes scones. xoxoxo
ReplyDelete