Showing posts with label scones. Show all posts

Wednesday, December 22, 2010

My popular favorite, moist, delicious Scone Recipe.


This is sincerely the greatest scone recipe I have tried. In fact, I had never really had a scone until I made these. Sure, in sheer desperation I have regrettably purchased scones from coffee shops here and there... and lived to tell the tale. But one day I came across this particular recipe on the Joy of Baking website and thought it looked so simple, why not give it a try.

The original recipe is for chocolate chip scones, and they are delicious. However, I have spent months playing around with other flavor combinations and learned some neat tricks along the way and I am finally ready to share my Yummy Scone Recipe!

Some tips before you begin:

·      Have all your ingredients and tools out and ready.
·      Using a baking sheet to pour all your ingredients over so you don’t make a mess on the counter.
·      Your butter must be cold cold cold! Frozen even.
·      When measuring flour, pour the flour into the measuring cup then scrape off the excess with a flat edge. Do not scoop out your flour from the bag using the measuring cup.
·      If you do not have buttermilk, put a tablespoon (or two) of vinegar in a measuring cup and fill the rest of the way with milk or half & half. Allow it to sit for a few minutes. Voila! Buttermilk.

 Flavor choices.
There are numerous choices you can make and experiment with. Here are a few tried and true combinations:
Dried Blueberry / Chopped pecans / lemon or vanilla extract
Dried cherries / slivered almonds / almond extract
Dried cranberries / chocolate or white chocolate chips / vanilla extract
Raisins / 1 tsp of cinnamon / vanilla extract
Dried peaches / 1 tsp cardamom / lemon extract


Ingredients:
2 cups all purpose flour.
¼ cup granulated white sugar
1 ¼ teaspoon baking powder
¼ teaspoon baking soda
¼ teaspoon salt
½ cup (1 stick) unsalted cold butter
A total of 1 cup nuts and/or dried fruit
1 teaspoon extract
2/3 – ¾ cup buttermilk
1 egg
Turbinado or raw sugar for topping
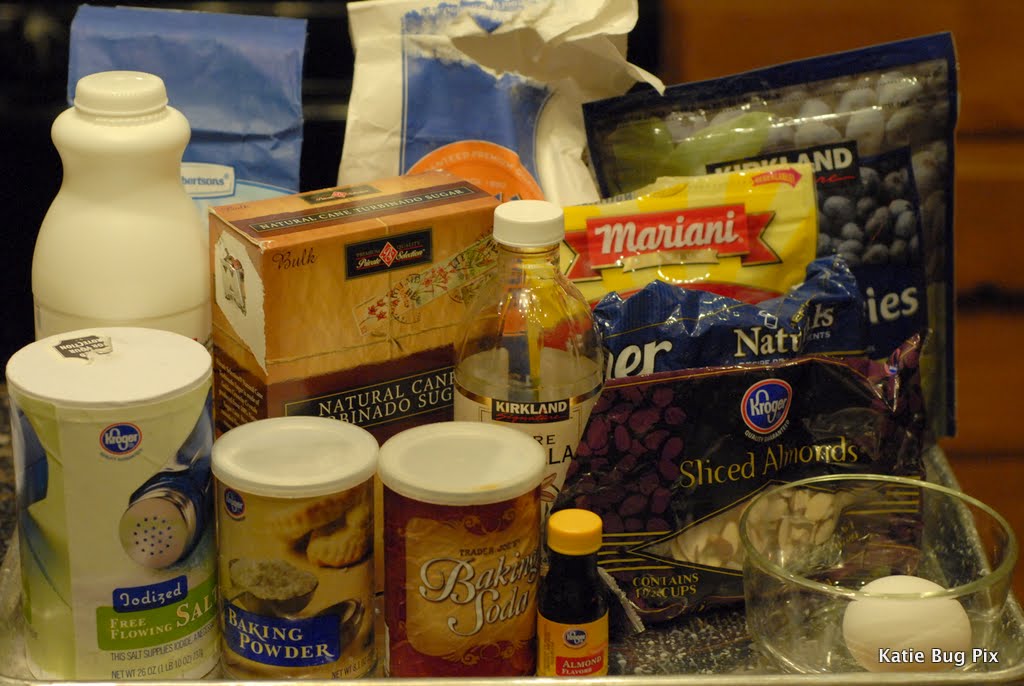
Let's got all our ingredients:

Imagine a big block of butter in here too. Woops.
Let's get all our tools:
Preheat your oven:
Prepare your pan with a spray of cooking spray and parchment paper.
Also, put a handful of flour on your pan for later.
Not sure why the color looks so strange.
Measure 1/2 cup dried fruit into a small bowl and cover it with water. Allow it to sit until you are ready for it. These are dried cherries and blueberries. I'm making cherry/almond and blueberry/pecan.

In large bowl, whisk together the flour, sugar, baking powder, baking soda and salt. 

Remember, when measuring your flour, pour it from the bag into the measuring cup then scrape off the excess with a flat edge.


 Once you have all your dry ingredients, now comes the butter. It better be cold, COLD, I tell you! Frozen, even. I recently learned the greatest trick evah regarding getting the cold butter in small enough mixable pieces for the scones. There is a great food blogger named Brown Eyed Baker and she shared this trick for making perfect pie crust. I knew instantly that it would work for my scones and I can't tell you how happy I was!


Ready? Ready????


A Cheese Grater!!!!!!
Ta Daaaaaaa!!!!!!!!
Here's what I do. First, I buy large blocks of butter because I go through tons of it. You do know you can freeze butter, right? Don't be afraid to buy it in bulk just because you think you won't go through it all. Freeze that buttah!


Since the recipe calls for one stick of butter and one stick of butter equals 1/4 cup, I remove the paper to where the 1/4 cup line is, or somewhat close.


Then, grate!
 And look at this magic pile of slivered cold butter that comes forth!
 I'm telling you, it's almost too much!
 Put the butter in the bowl with the dry ingredients. Using your clean hands, smash the butter between your fingers, mixing it with the flour until it is all incorporated and looks like coarse crumbles.
See? Coarse crumbles.

Now we are going to measure 1/2 cup of slivered almonds. Oh, forgot to mention, this recipe is one of my favorites: Cherry Almond. I messed up above and used vanilla instead of almond extract. Boo hoo! S'ok. They are still amazing.


Now, drain the cherries that have been soaking in water. 

HINT: when using dried fruit in scones, the fruit cannot be larger than a blueberry or it will be too big and make the scone fall apart. So take a large knife and just chop through the fruit a few times. No need to mince it, just a good chop.
Here we have added the almonds and cherries to the dry ingredients.

Now pour in the buttermilk/extract mixture.


I like to take a big wooden spoon and swirl it around the edge a few times before I dig in with my clean hands to mix everything completely. Your hands are often the greatest tool!


Mix until dough just comes together. Then transfer the dough the floured surface on the prepared baking pan.
Shape the dough into a inch and a half thick wheel shape.


(I'm gonna stop right here and say I am so tired of Europeans making fun of how Americans do scones. So we like to add all kinds of nuts and fruit!? So we like them in a cone shape?! What of it! Are we constantly making fun of the fact that you have such little interest in dental hygiene???? Oh wait...)

Anyway, at this point I crack an egg and whisk it around a little. Using a pastry brush brush the entire top of the scone wheel with egg.


Then sprinkle with tons however much Turbinado or raw sugar you like. Or not, maybe you are European and rolling around in disgust at all the sugar this American puts in her pastry. That's OK. I can out-sugar you any day.
Taking a large knife, cut across the wheel a total of 4 times. Like a pizza! So you end up with eight separate scones.
Carefully pull them apart and distance each scone from one another. Scones do not play nice with each other.
 Slide into the oven. Set the timer for 16 minutes then turn the entire pan and add another 2 minutes to the timer.
 Voila! Moist, American Scones! (tee hee) 


You can easily make a double batch of scones, place them on two separate pans, bake one right away and cover the other with plastic wrap. This pan can remain in the fridge for up to three days. Imagine, fresh baked scones during the week!
 

Sunday, October 31, 2010

Happy Halloween! Pumpkin Scone Review


Happy Halloween everyone! It feels like a great fall morning here. Love it!

I woke up in a great mood and excited about the day ahead. That hasn't happened in a while. OK, so I didn't literally wake up in a great mood - the baby is teething or something so was up till about 3 screaming and uncomfortable and the oldest boy felt the need to wake up before dawn and turn his light on. Then come let me know the baby was awake. Well Ya, you left the light on!

Gosh, it's interesting to actually watch how fast and easily moods can change!

Eventually, I was excited for the day and felt like doing some baking. I started off by throwing together Baked Oatmeal in the crockpot. I've made this recipe dozens of time. It's really really yummy. We call it Breakfast bars around here. No reason. We just do. To this wonderful base recipe I add about 1/2 cup of peanut butter baking chips and for the dried fruit, today I used dried cranberries. I made it in the massive crockpot so it will probably be done in just a few hours.

Then I had a hankering for pumpkin scones. I bought a few cans of pumpkin filling and have been looking forward to trying something with it. Last year I did the ol' fresh pumpkin thing and then made muffins with it. That was a crazy amount of work to get a few puny muffins that didn't taste more amazing because of the fresh pumpkin. Ya, I'm over it. Canned pumpkin it is!

So I searched for a recipe and found this one for pumpkin scones. It looked awfully trustworthy. Here's the little details of what I did differently. First, I doubled the recipe. I knew from experience that a recipe for scones using only two cups of flour was not going to yield that many. Second, I knew that I could split the scone dough in half and set up another pan, wrap it and put it in the fridge for tomorrow morning.

Did you know uncooked scones can sit happily wrapped up in your fridge for up to five days? Really! Just think, fresh scones any day of the week!

Next, the recipe calls for only 1/2 cup of pumpkin filling and I was not interested in opening a can of pumpkin filling and only removing 1/2 cup. What would I do with the rest? Sheesh. This way I used almost the entire can. Almost.

I did not have buttermilk on hand, as usual. No problem! I pour almost a cup full of milk then add two tablespoons vinegar and let it sit for several minutes.

Confession: I normally tell people that with baking you really have to follow the rules of the recipe as it is written. One rule I always break is when the recipe calls for milk, I always use whipping cream instead. The difference all the fat makes in the moisture is unbelievable. So when I made my "buttermilk" it was actually whipping cream and was very thick. I am absolved.

A few weeks ago I found the niftiest set of measuring spoons at the thrift store. It not only had the 1/8 teaspoon measurement, it even has a 1/2 tablespoon measurement! Isn't that awesome?! Oh, the little things that make novice bakers happy.

So today the recipe called for 1/4 tsp baking soda and I mistakenly used the 1/2 tablespoon. It was too late and I just thought, well, let's see what happens.

I also added one cup of chocolate chips. Duh. Woops, just realized I forgot to do an eggwash before I sprinkled raw sugar on the tops. Oh well. I love raw sugar for just these purposes. It gives your finished product a nice little crunch, looks great, and who couldn't use more sugar?

Oh ya, the dough was wet. Wayyyyyyyyy too wet. Scone dough shouldn't actually stick to your hands when you are mixing it (your hands are your best tools. Did you know that? Plus, I don't have a food processor.)So I had to ask my husband to come rescue me by adding more flour. I would say I had to add at least another 1/2 cup of flour. Don't be afraid to figure out how to get the consistency just right. Yes, baking is a science, but that doesn't mean you can't experiment. Add a little at a time and then see where you are.

I split the dough in two and put on two separate pans lined with parchment paper. Forming a sorta ball, I then press down the dough until it's about 1 1/2 inches thick. Here is where I sprinkle the raw sugar on top. Then using a large knife I cut like a pizza into 8 pieces. Gently pulling each piece away into its own separate area. Scones can be a little snotty sometimes; they like their own space.

I baked them at 375 instead of 400. Our elevation is around 5300 feet. So we're kind of in a weird in between state: not exactly "high elevation", but certainly not normal. You can always adjust the time you cook them for, but if they bake too hot, then they can get too crisp and dark on the outside without the inside being done.

They baked for probably 20 minutes. I always set the timer for when I think they will be just almost done. Then you can check and add two more minutes if needed. They could probably have stayed in another two or three minutes but I don't like mine too brown or overdone. I don't like scones that are dry. Some people do. I don't. (They are weird.)

The tops were cracked just a little and when I pressed on them slightly there was little to no give. If they are not done yet and the insides are still too gooey, they will give a lot more when you press on them.

They are really really delicious. Like crazy good! I'm really happy with how they turned out and even more happy to know I have a pan already to bake tomorrow morning (or this afternoon, depending on sleep deprivation treats me today.)

Sorry no pictures. My camera died and I'm too embarrassed to use a camera phone picture.
Plus I am just not a great food photographer. Weddings and people, yes. Food... well, it can be snotty sometimes.

Have a great day!